I think everyone knows that lossy audio compression formats in the likes of MP3 and AAC sacrifice audio quality for a smaller file size. Some people like myself can distinguish between lossless and lossy copies of the same song just by ear, but most cannot, or simply do not know what to listen for.
You can easily take a diff of 2 text files and see the differences, so why can’t you do that with audio?
For my experiment, I began with Jillette Johnson’s song “Torpedo” stored as lossless 16bit/44.1kHz CD audio in the FLAC format. For copyright reasons, I won’t provide a download link to the file, but the Internet is a thing, so you can find it if you want.
I began by transcoding this original into several different formats with varying parameters:
- 320kbps CBR MP3 – 10.9MB
- 256kbps CBR MP3 – 9.1MB
- 256kbps VBR MP3 – 8.4MB
- 128kbps CBR MP3 – 5.6MB
- 256kbps CBR AAC – 5.4MB
- 500kbps VBR OGG – 15.5MB
- 256kbps VBR OGG – 9.6MB
CBR stands for constant bitrate, and VBR is variable bitrate.
I took one channel from each converted file and the original FLAC file and aligned them to the sample. I then took the difference of the 2 waveforms. This resulting difference is the error induced by the compression algorithm. I saved 3 data points from each comparison: the waveform as an image, the frequency spectrum versus amplitude plot, and a rendered audio file of the error. The waveforms plot the relative amplitude at each moment in time from 0 to 1. The frequency spectrums show the average amplitude in decibels (dB) of each frequency from 0Hz to 22,050Hz (the maximum of CD audio) over the entire signal. 0dB is the highest amplitude that can be stored in the audio file. All amplitudes are taken relative to this maximum and are expressed in negative decibels, so the more negative the amplitude, the quieter is is. I have chosen to render the error signals as uncompressed WAV files in order to accurately represent them in their entirety and still allow them to be played in a web browser (most don’t have FLAC support yet). I have not amplified any of the error signals to keep everything as accurate as possible. If you intend to listen along, try seeking the track to the times listed along the top of the waveform images to hear how different parts of the song sound, like the chorus at 1:40. Also note that I’m not really interested in the exact error versus filesize figures, so feel free to figure them out on your own.
Just a disclaimer; I am not an audio engineer and these tests are in no way scientifically accurate. This is just a home-grown experiment.
Let’s take a look at the 320kbps CBR MP3 first. You can click any image to enlarge it in another tab.

320kbps CBR MP3 Error
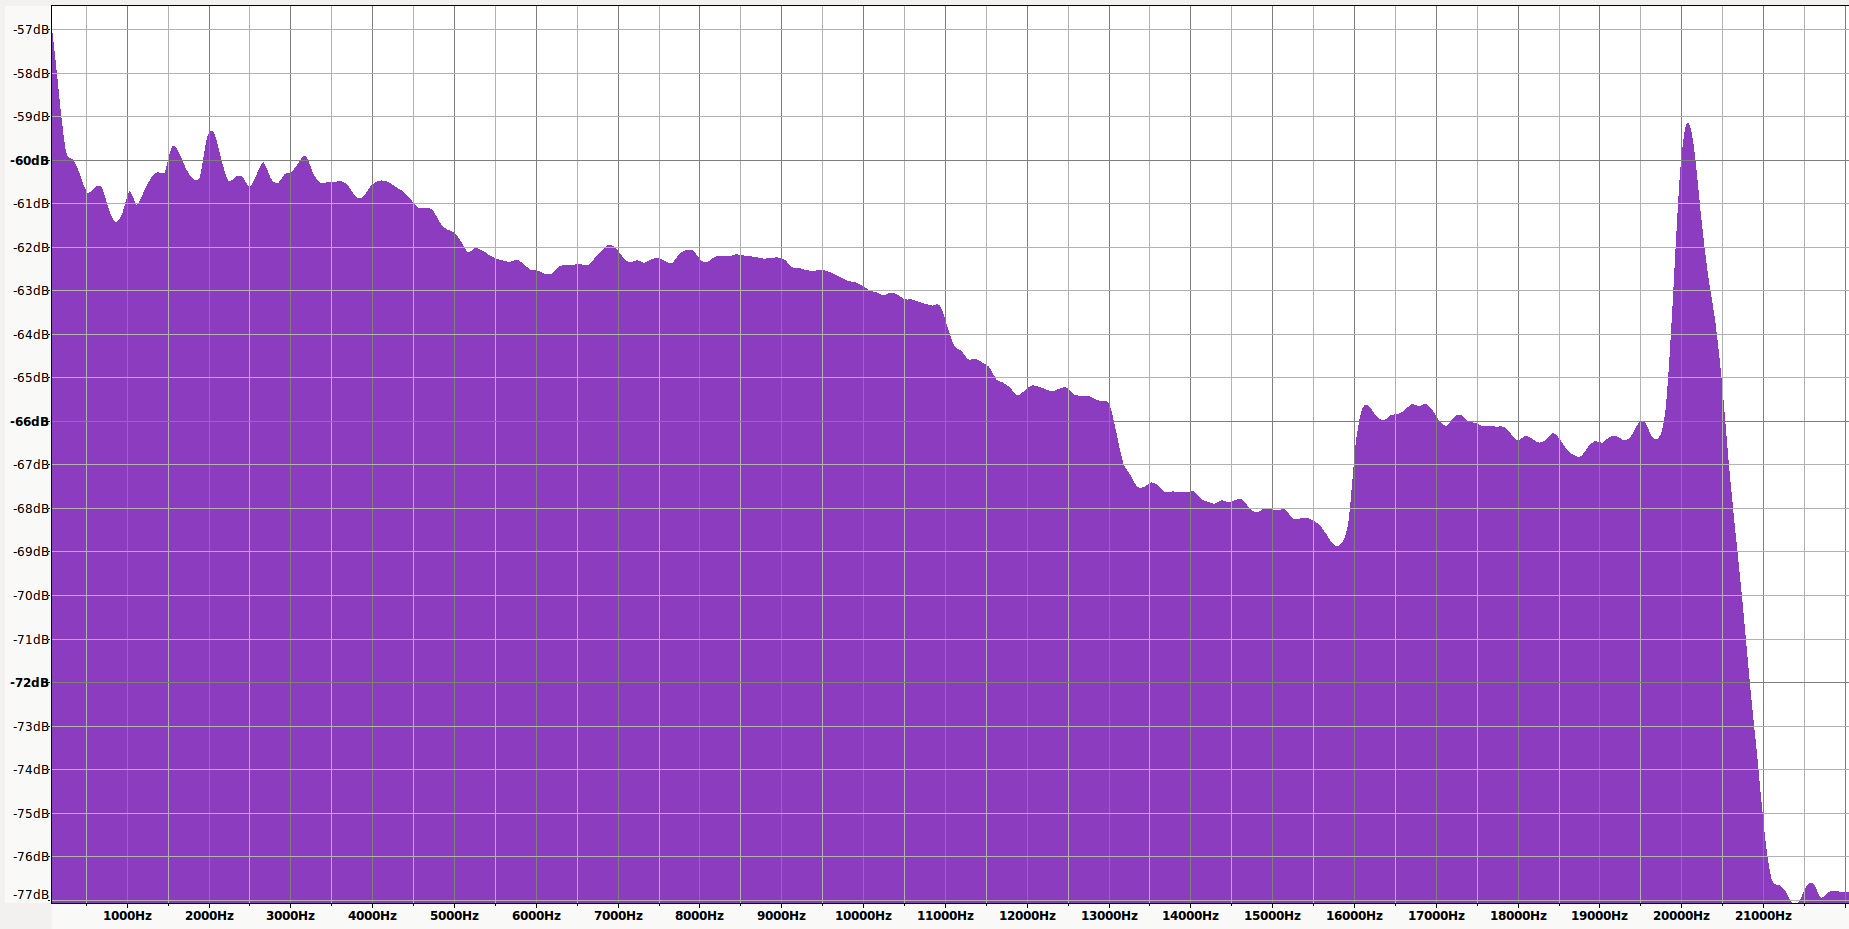
320 CBR MP3 Spectrum
Listen to the 320kbps CBR MP3 Error
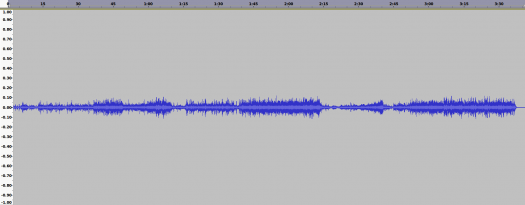
As you can see (and hear), the error is clearly there. If you know the song, you can probably even make out lyrics. The first thing to note is that the highest amplitude error is in the high frequencies, specifically above 16kHz. This is not surprising, because this is how MP3 was designed. MP3 takes in to account how we perceive sound. Frequencies in the range of the human voice for example are most important, and high frequency content which is for some people not even audible at all, is least important. The highest error amplitude peaks at -53dB with the average around -61dB.
In order to make some comparisons, let’s take a look at 256kbps CBR MP3.

256kbps CBR MP3 Error
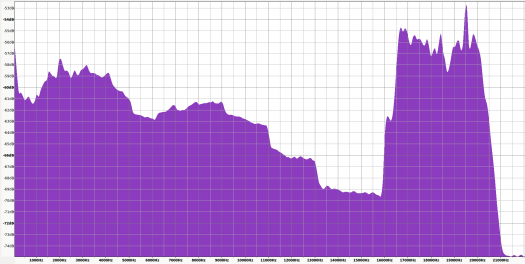
256kbps CBR MP3 Spectrum
Listen to the 256kbps CBR MP3 Error
Notice that the highest peak is at -52dB, not much higher than the 320kbps CBR file, however the other frequencies are significantly higher, by about 3 to 4 dB. Remember that dB is a logarithmic scale, so an increase by 3dB is roughly 10 times louder.
I have heard that VBR is “better” than CBR, so I decided to test that as well.

256kbps VBR MP3 Error

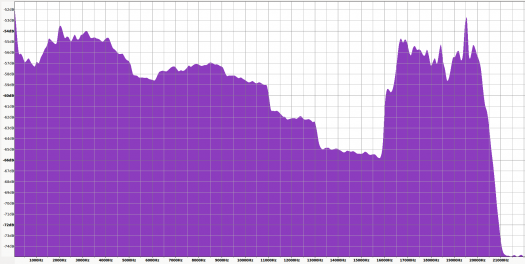
256kbps VBR MP3 Spectrum
Listen to the 256kbps VBR MP3 Error
Going from 256kbps CBR to VBR, the spectrum is very similar with the exception of the high frequencies. The peak that was very prominent at 320kbps CBR, and slightly less at 256kbps CBR, is now actually lower in amplitude than the lower frequencies. At a glance it looks like the error has actually decreased, but look at the scale. The overall error has actually increased by 1 to 2dB. Now given that the file size is 700kB lower, it’s debatable whether VBR is “better”.
Just to round out this part of the experiment, I tested 128kpbs CBR MP3 as well.

128kbps CBR MP3 Error

128kbps CBR MP3 Spectrum
Listen to the 128kbps CBR MP3 Error
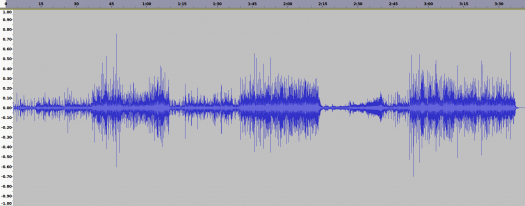
The average error is a whopping 10dB higher than the 256kbps CBR, and follows an almost linear drop as the frequency increases. This is consistent with the gradual drop off of average amplitude in the original file, so statistically that is expected. At this point the song is becoming scarily audible; making out lyrics is not difficult at all. Just remember that what you hear in the error signals is what is missing from the transcoded file.
Who says that MP3 is the only format used for lossy compression? I thought I’d start off with the lesser known OGG Vorbis audio codec. The following is the result of transcoding at 256kbps VBR.
256kbps VBR OGG Error

256kbps VBR OGG Spectrum
Listen to the 256kbps VBR OGG Error
This is quite different than what we saw with the MP3 spectrum, and it sounds very different too. The OGG codec has higher error at low frequencies, which is easier to hear than see, however the overall average error is less than that of MP3 over the rest of the spectrum, by about 2dB. Being 1.2MB larger in size than the 256kbps VBR MP3, this should be expected.
Unlike MP3, OGG is not limited to 320kbps. I ran the test at a bitrate of 500kbps VBR.

500kbps VBR OGG Error

500kbps VBR OGG Spectrum
Listen to the 500kbps VBR OGG Error
The filesize is 5.9MB larger than the 256kbps VBR OGG file, but the error is a massive 15dB lower on average. Surprisingly, the error at the low end is still worse than that of 320kbps CBR MP3. Also note that just because the spectrum plot bottoms out around 17kHz does not mean that there is no error there, it is just at -82dB, which is near the edge of the zoomed in area.
The last file type I compared, is 256kbps CBR AAC, the same format used by Apple for most iTunes downloads.
256kbps CBR AAC Error

256kbps CBR AAC Spectrum
Listen to the 256kbps CBR AAC Error
I was kind of horrified at how poor the output was. The error is only about 2dB less than the 128kbps CBR MP3 file. The only saving grace for AAC is that the resulting filesize was 5.4MB, 200kB less than the 128kbps CBR MP3. The error also sounds very different than the other formats.
A common scenario is the conversion of one lossy format to another. In my library, all files are either FLAC or MP3, so when purchasing music off iTunes for example, it would make sense for me to transcode the files to 320kbps CBR MP3.

256kbps CBR AAC to 320kbps CBR MP3 Error Difference
256kbps CBR AAC to 320kbps CBR MP3 Difference Spectrum
Listen to the 256kbps CBR AAC to 320kbps CBR MP3 Error
The error doesn’t seem that bad, however, remember that this is the error from the second transcode. This error compounds on the error from the original transcode. The following is a diff taken from the original FLAC to the new MP3.
256kbps CBR AAC to 320kbps CBR MP3 Error Difference from FLAC

256kbps CBR AAC to 320kbps CBR MP3 Error Difference from FLAC
Listen to the 256kbps CBR AAC to 320kbps CBR MP3 versus FLAC Error
The total error is almost no different from the original AAC. This is not surprising, as the relative amplitude of the new error in the AAC to MP3 conversion is several orders of magnitude lower than the original error in the AAC file.
In a future post I’ll explain more about errors in audio reproduction more mathematically, including quantization error and bit depth, sample rate, and noise floors. Until then, I hope this was interesting and provided a little more insight into audio compression quality.